Recently went to my parents place and finally picked up all of my books, and accompaning bookshelves. You see, i have loved books ever since i was a little child. I still remember the first proper 'novel' i read in first grade, called Amelia Jane gets into trouble by the lovely Enid Blyton. I was hooked!
However i was so hooked that i refused to get rid of ANY book i ever owned.... so now here i am with 6 mega garbage bags filled with books. They range in every possible genre and thickness! When i moved out with my husband (then fiancee) i left my books behind as i anticipated that it was going to be a huge job, and that i would need a place to put them all.
My mother always shared a love of reading with me, so when it came to taking the books we had to have a few negotiations over who got to keep which books. She allowed me o take all the Enid Blytons but she got to keep Raymond E Fiest... i tried to con her into giving me the Anne of Green Gables series but she didn't budge on that one *Pout*
We do have a dilema though. I was planning on making a bookshelf wall on the far end of our 'entertainment' room. I say 'entertainment' because it is currently a room housing an unused weight set, various boxes and our old plasma which we plan on eventually mounting on the wall.
Anyway, i digress, our dilema is that the antenna port and electrical socket for said TV is on the aforementioned wall. We are unsure at this point whether to a) move the antenna and electrical socket b) cut a hole into one of the shelves or c) choose another spot... sigh...

This is my spot to share my life and loves.
Sunday, June 7, 2009

Saturday, June 6, 2009
Mini Quiches

I mentioned these yummy quiches on my previous post. I would highly recommend these as they tasted so damn good and were sooo easy to make! I found the recipe on http://www.exclusivelyfood.com.au/ but adapted it to what i had on hand.
You could easily adapt this recipe and make these into any combination of flavours that you like!
Makes approx 24 mini quiches
4 large eggs
1/3 cup full cream milk or cream ( also had some left over buttermilk so i added a slop of that too...)
1/3 cup full cream milk or cream ( also had some left over buttermilk so i added a slop of that too...)
1/4 grated onion (or you could finely chop shallots)
salt and pepper
2 sheets thawed puff passtry
1 cup grated cheese
1/2 - 3/4 cup diced bacon or ham
In a bowl mix the eggs, milk, onion S&P in a bowl until well combined
Using a round cutter approx 8 cm in diameter (i used a scalloped cookie cutter i had) cut out rounds of pastry. Pop the pastry rounds in a well greased muffin pan. The pastry should be a little bigger than the bottom so that it forms a slight lip/curve.
Sprinkle cheese and bacon in the bottom or each pastry round. Spoon on egg mixture over top.
Put it in a pre heated 200C oven. Bake for approx 15 - 20 minutes until the pastry is puffed and golden.
Perfect. The crisp buttery pastry, eggy creamy centre with the salt from the cheese and bacon make these the perfect finger food... Too easy.
Kitchen Tea Madness
I recently hosted a kitchen tea for my lovely friend Maree. She is my oldest friend and i have shared so much with her over the years. I was so delighted to be able to host the Kitchen tea for her and show her how much i loved and cared for her. I have three very close girlfriends, one of which is maree. The other two are Ange and Jo. We have been friends since highschool and are pleased to see that our friendship has grown from strength to strength through the years.
I have been eying of a cake design in the window of my local cake art shop of a Tiffany blue cake with utensils out of the top. I also recently brought the wonderful Planet Cake book and have been itching to do a novelty cake with fondant icing.
I have never actually done a proper fondant cake so i was excited but apprehensive
I baked the cake a week in advance and froze it so that i would be ready. I then made the ganache the night before. Planet cake advise to give 3 days to do a cake, so you bake it, ganache it and then ice it. I was really pleased with how my ganaching went and once it was firm it provided a great base to work with. The morning of the party i tinted the fondant light blue and followed the instruction from planet cake. I didn't have some of the tools the recommend but my clean hands (sans rings..)were still able to make it smooth and lump free.
I had found some miniature utensils to put in the top of my cake and made a bow from the planet cake book.
The finished product? I was pretty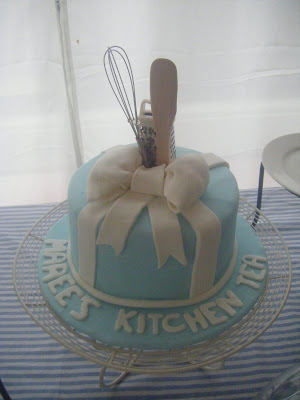 pleased with myself!!
 pleased with myself!!

The cake itself was a choc mud, and i think it tasted really yummy and moist. Although it was a shame to cut up the pretty cake.
I went a little baking crazy too and i made all of the food for the party. ALthough this was also partly due to cost. I looked around at some pre made quiches but i just felt that they were way too expensive for something i could easily make myself.
In the end i made the following food
- Miniture Buttermilk scones
- Cheese and ham quiches ( i will post this recipe next. It was just so easy but tasty!)
- Tuna/ Chicken bagettes
- Chocolate tarts (these i did cheat with, i brought ready made cases and used left over ganache)
- Berry and cream Tarts
A JoJo brought some frozen mini croissants and we covered those with cheese and bacon and baked them . Maree's lovely MIL brought along her famous caramel and cream pies.
YUM YUM!
Sunday, May 24, 2009
Free Art
Beautiful Free Art. Check out the website for more details. These are some that i am loving

Friday, May 22, 2009
Bedroom Inspiration
I have plans to eventually redecorate our bedroom. It has a lot of potential to be a really lovely room. with a fantastic enclave built into the back wall, which fits our bed, with bedside tables built into the side on the enclave. The roof also has lovely floral cornices. The walls are painted white with a pleasing feature wall in the enclave.
What i also love about our room is the wrap around windows that run along two of the sides. I think these would look fantastic as wrap around benches that double as additional storage.
Right now it is just an idea. But here is my 'inspiration board'

1. I want to put a chandelier motif above the bed on the feature wall, in white.
2 & 3. Two examples of the link of wrap around benches that i want. My window looks very similar to number 2
4. I looove Amy Butler fabric, and would adore a quilt made from this beautiful fabric.
So, what do you think? A girl can dream can't she?
Tuesday, May 12, 2009
Recipe - Herbed pork with roasted pumpkin, apple and onion on a bed of Pak Choy

This morning i went digging through the freezer and spied some chicken breast, which i pulled out to defrost before i headed to work. I was planning on making Honey Mustard chicken, as i have had a masterfoods packet sauce in the pantry for a while and wanted to use it up.
However two things prevented me from cooking that meal this afernoon.
- The first being that my husband called to let me know that he would be home late from work and not to expect him until about 7. Thus meaning that i had alot more time to prepare dinner
- The second.. and main reason... was that i realised once home that i had in fact lifted out pork, not chicken. It is a timely reminder to mark my meat next time.
I did a spot of gardeing while i was deciding what to cook, and picked a large bunch of Pak Choy from our garden. I decided that i definately wanted to make something using our fresh Pak Choy.
Once inside i had a fossick through my cookbooks, and came accross a recipe for corinader and garlic pork in my old faithful Donna Hay. This was perfect as i had a bunch of Corinader, mint and basil wilting away in the fridge. I wanted to keep the carbs down so i pulled out some butternut pumpkin, and needed that all important sweet component that i believe is a must for pork, so grabbed some apple and and onion. I was on my way.
Corinader, Basil and Mint marinade (in Donna it is corinader only) with Pork
1 cup of above herbs - finely chopped
4 garlic cloves - crushed
olive oil ( the recipe stated 2/3 cup but i try to keep the fat low so i added about 2 tablespoons)
Mix all of the above together. Add pork, toss until well coated. Set aside.
Once the other veggies are nearly done, i put a frypan on medium heat. Add the pork and cook for approx 3 minutes each side.
Pumpkin, Apple and Onion
For these i peeled the pumpkin, and chopped into chunky pieces.
Took the outer skin off the onion and cut in half
Washed the apple. Took the sticker off (a very important step might i add!)
I drizzled the lot with a small amount of Olive Oil, and also drizzld a cap of Balsamic onto the cut onion. I put it in a Pyrex dish with a lid
Popped in a slow oven (approx 160) and bake for over 1 hr. Take the lid off in the last 15 - 20 minutes and turn up the heat to help it brown a bit
Pak Choy
Chop up leaves into large pieces. Slice the stems. I then popped it into a pyrex bowl with alittle water and some of the pork marinade (before the pork was added of course). I put it in the Microwave and cooked for about 4 minutes.
VOILA!!! It sounds WAY more complicated than it really was. The Pumpkin you could cook for less time in a hotter oven, but i knew i had over 1 hr so just popped it in on low until Hubby was nearly home. It was VERY tasty, with the pungent hit of herbs and garlic mixed with the sweetness of the pumpkin, apple and onion. Yummo!

Friday, May 8, 2009
Photo Wall continued ...
After finding the paint i got to work. I firstly laid out the frames in front of the wall that they were to hang. Here i sorted and arranged them into a rectangular shape. Some of the frames i was keeping with their timber finish, while others i was going to paint. The frames were varying sizes so it made it a little bit more complicated to arrange.
Next i went through my wedding album and chose what photos i wanted to print out for the frames. Once this was decided i was ready to start painting. I painted the frames with about 3 coats of paint. (I am rather pleased with how they look, although they are by no means perfect).
I printed out the photos to the right size and use my trust guilotene to cut the paper and mounted the photos into the frame.
The last step was to hang the photos. This is where i know i have no talent at all. I have no sense of straight or crooked, so i handed this task over to my lovely husband! his is where his perfectionist qualities come to play, and he busily set about measuring out the spaces and carefully mounting the frames. We used 3m velcro strips, which are great forgetting the perfect position.
Next i went through my wedding album and chose what photos i wanted to print out for the frames. Once this was decided i was ready to start painting. I painted the frames with about 3 coats of paint. (I am rather pleased with how they look, although they are by no means perfect).
I printed out the photos to the right size and use my trust guilotene to cut the paper and mounted the photos into the frame.
The last step was to hang the photos. This is where i know i have no talent at all. I have no sense of straight or crooked, so i handed this task over to my lovely husband! his is where his perfectionist qualities come to play, and he busily set about measuring out the spaces and
 carefully mounting the frames. We used 3m velcro strips, which are great forgetting the perfect position.
Once up we also added our L.O.V.E letters to the wall that we used in our wedding.
Beautiful...
Subscribe to:
Posts (Atom)